The Intersection Bridge

The Intersection Bridge was the first bridge to carry one railway, the St Helens & Runcorn Gap (SH&RGR), over another, the better known Liverpool & Manchester (L&MR). It was situated on the Sutton inclined plane not far from St Helens Junction. Although the bridge persisted for a good many years after the line closed, it was much modified and what we know of it derives mostly from an aquatint prepared by SG Hughes and published in 1832.

view_of_the_intersection_bridge,_from_bury's_liverpool_and_manchester_railway,_1832_-_edgehill_2
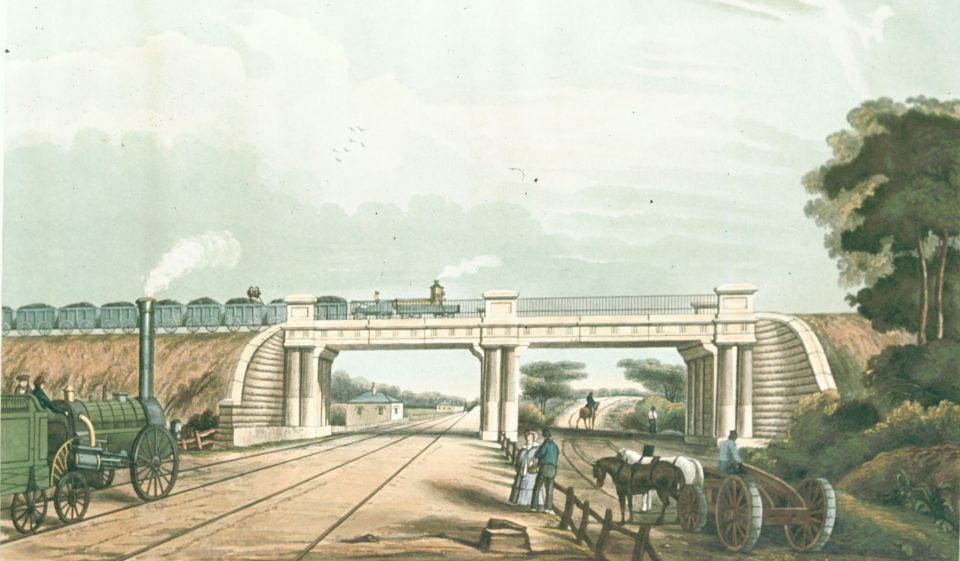
Fig: View of the iron Intersection Bridge looking east down the Sutton inclined plane towards St Helens Junction and Manchester beyond. The print is dedicated to brewer Edward Greenall, father of Peter who was also a supporter of the SH&RGR.

What the picture tells us

The image (zoomable versions) is interesting for a number of reasons. Firstly, the artist is unknown but is presumably Thomas Talbot Bury who produced a popular series of coloured views of the L&MR published by Rudolph Ackermann. Why he is unattributed here is unclear. He did, however, produce a revised series of L&MR prints in 1833 so likely was available for this commission. However, it is worth noting that the SH&RGR did not open until February 1833 so whether the embankment and bridge were complete and coal being hauled routinely may be doubtful. However, one coal train apparently did run in November 1832 to win a wager that the line would be operable before the year's end; perhaps that event is recorded here although the lush foliage suggests otherwise. The line was supposed to take coal from the collieries around St Helens to the Mersey around Runcorn Gap, modern-day Widnes but the dock was not finished by the time the railway opened in February 1833 and only completed some six months later.

It follows that the interpretation given below is even more conjectural than usual. It may represent circumstances that pertained for a short time or not at all.

The bridge was designed by Charles Blacker Vignoles who produced the survey for the Rennies that underpinned the enabling legislation for the L&MR passed by Parliament in 1826. He subsequently resigned from the L&MR after being blamed by George Stephenson for an error in the survey for the Wapping tunnel.

As with the L&MR Water Street bridge, the structure was made of iron. It appears to have had some architectural aspirations (perhaps a riposte by Vignoles to the L&MR) with Doric pillars, pilasters and triglyphs although, as an architecture student, Bury may have accentuated them to a degree. The bridge appears to have been widened and modified over time and I am not aware of any other records of its original appearance.

The picture shows three people beside the railway, a man and woman plausibly waiting for the train in the distance and a man on a cart in Leach Lane (which leads through to Penlake Lane beyond). Although it could be waiting to take on passengers in transit, the cart does not appear to be especially suited to the purpose and it seems more likely that it is waiting to collect goods, perhaps empty milk churns or similar.

In front of the couple is a broken stone sleeper of the kind used to support the rails (the sleepers were buried so are not normally visible). On embankments, however, wood sleepers were used. Both the SH&RGR and L&MR used standard gauge. This sounds trivial with hindsight but, of course, enabled growth of a network.

By 1832 the L&MR was operating mixed use second class trains so it is not unlikely that the well-dressed prospective passenger is waiting to board the same train, the man attending her being an L&MR employee, perhaps a policemen who will flag the train down (no signals are visible).

The policeman may have been based in the cottage just beyond the bridge on the left. It clearly has access onto the track and the drop-ended hood mouldings are typical of L&MR buildings at this time. This area was known as Toad Leach, later Sutton Leach, and it is possible that the station is the one known as Sutton in early schedules. This is normally ascribed to the station now known as Lea Green (also termed Top of Sutton Incline) but it is possible that the stopping-place swapped between the two locations for a time.

The rationale for this may have been the development of passenger traffic on the otherwise mainly mineral-oriented SH&RGR. The latter is known to have purchased two coaches from the L&MR that were ordinarily attached to the end of coal trains. The notion that there was an interchange at the bridge is supported by an account by George Head of a journey along the SH&RGR from St Helens to Runcorn Gap.

George Head's experience of the SH&RGR

Head travelled from Liverpool to St Helens, alighting at St Helens Junction (which can be seen in the distance on the left of the track) and then taking a horse-drawn wagon along the branchline to the centre of St Helens. The same conveyance later took him on the SH&RGR mainline and over the Intersection Bridge where it dropped him on the embankment before going back to collect passengers from Liverpool and Manchester, possibly from Sutton station (if the station persisted and there was a staircase to the embankment) or all the way from St Helens Junction, a round-trip of approx. 2 km.

The ascent of the embankment involved an inclined plane either side of the bridge. An 1849 map suggests the engine house was south of the bridge, not far from Leach House. It powered a continuous rope haulage system although the descent was conducted under gravity. Head goes into some detail as to how the operation was managed. Ultimately, when the L&MR passengers had joined those waiting, they entered two new carriages, half-closed, half-open, attached to a coal train hauled by a locomotive and then descended the inclined plane towards Runcorn Gap, the whole journey of 8 miles taking three hours and costing 6d and 9d for the two stages either side of the bridge.

The locomotives

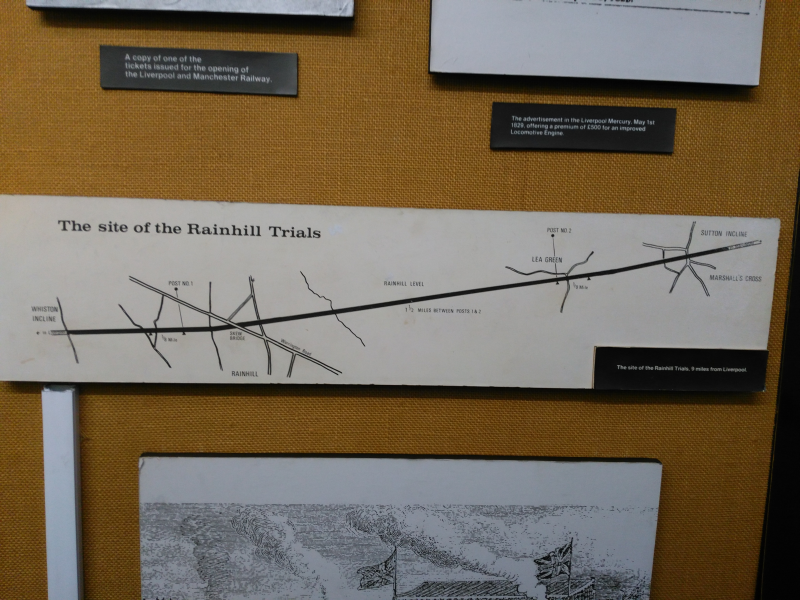
The locomotive on the bridge is presumably either William IV or Queen Adelaide, developed from Braithwaite and Ericsson's Novelty which competed at the Rainhill Trials in 1829. Novelty is supposed to have been used on the SH&RGR whose engineer, Charles Blacker Vignoles, was a supporter of Novelty at Rainhill (he also designed the Intersection Bridge). William IV and Queen Adelaide were follow-on commissions by the L&MR after Rainhill but arrived too late for use at the opening in 1830 and were generally felt to be under-powered for the luggage trains they were intended to haul. Their ultimate fate is unrecorded but it would not be a surprise if they also spent some time on the SH&RGR.

locomotive wilhelm iv dampfwagenwilhelmderiv
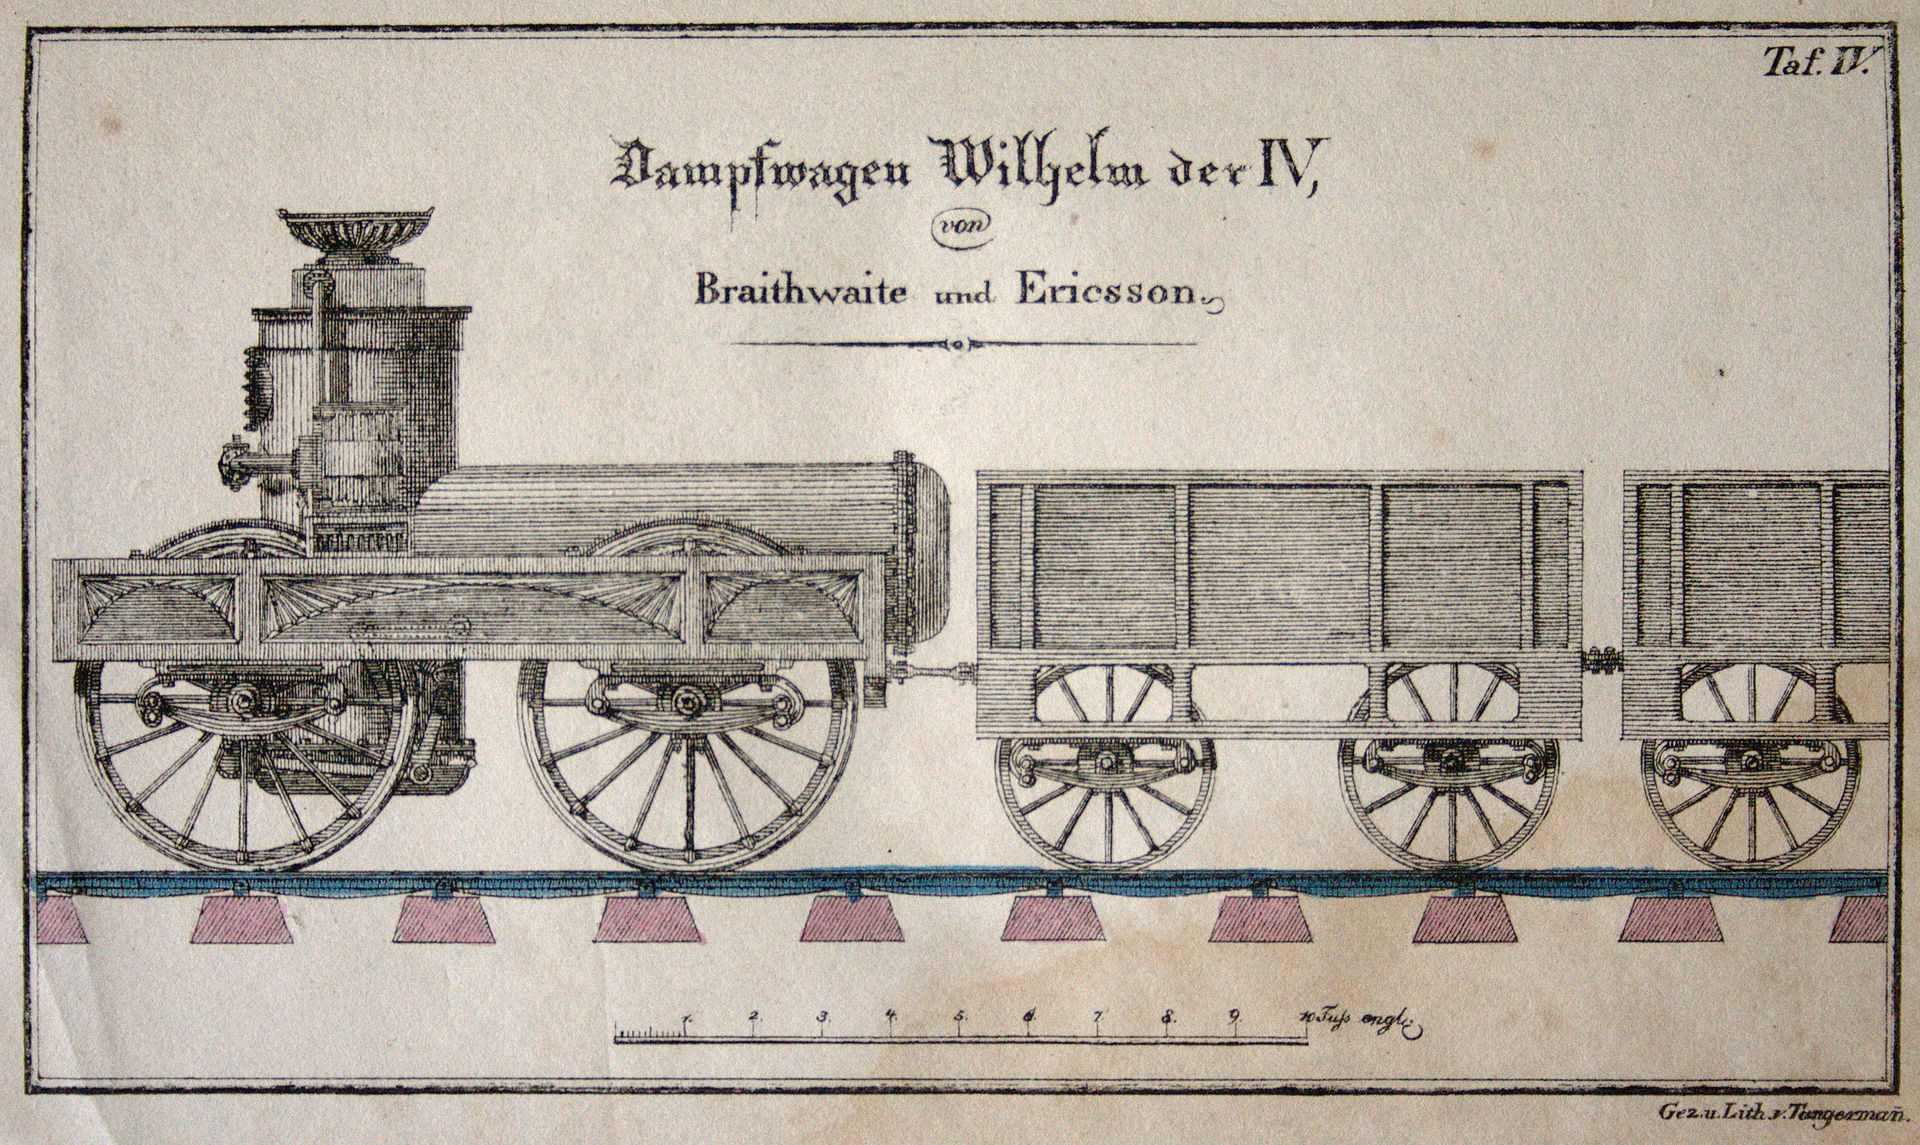
Fig: Locomotive William IV designed by Braithwaite and Ericsson.

The locomotive on the left is presumably Northumbrian which continued in use until 1836. Although an advance on the other engines used on the opening day, it was rapidly superceded by the Planet class so may have been a one-off design.
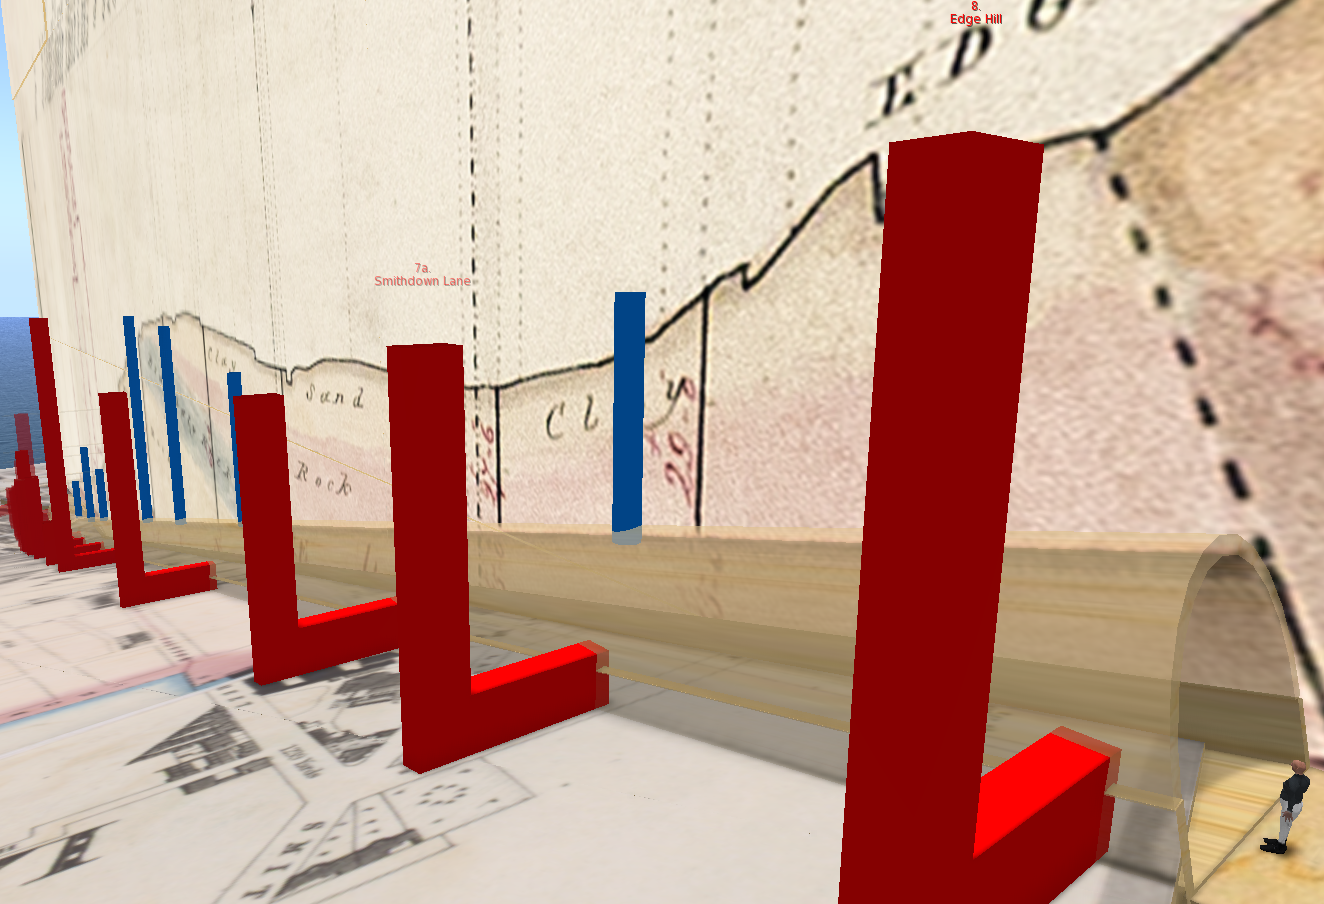
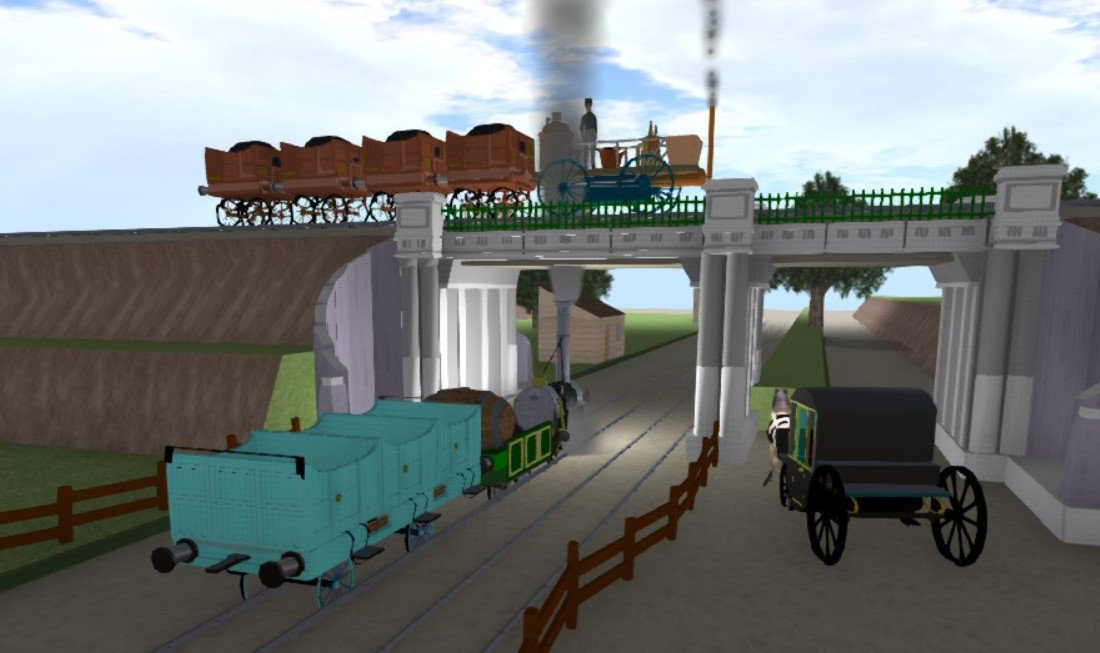
OpenSim build

This is a rather old scratch build but illustrates the principal features of the location at the time. The cottage in particular needs further work. The engine shown on the bridge is the smaller Novelty rather than William IV or Queen Adelaide in the original picture.

intersection bridge

Further information

The SH&RGR competed with the Sankey Canal for carrying coal and indeed later merged with them to form the St Helens Canal and Railway Company in 1845.

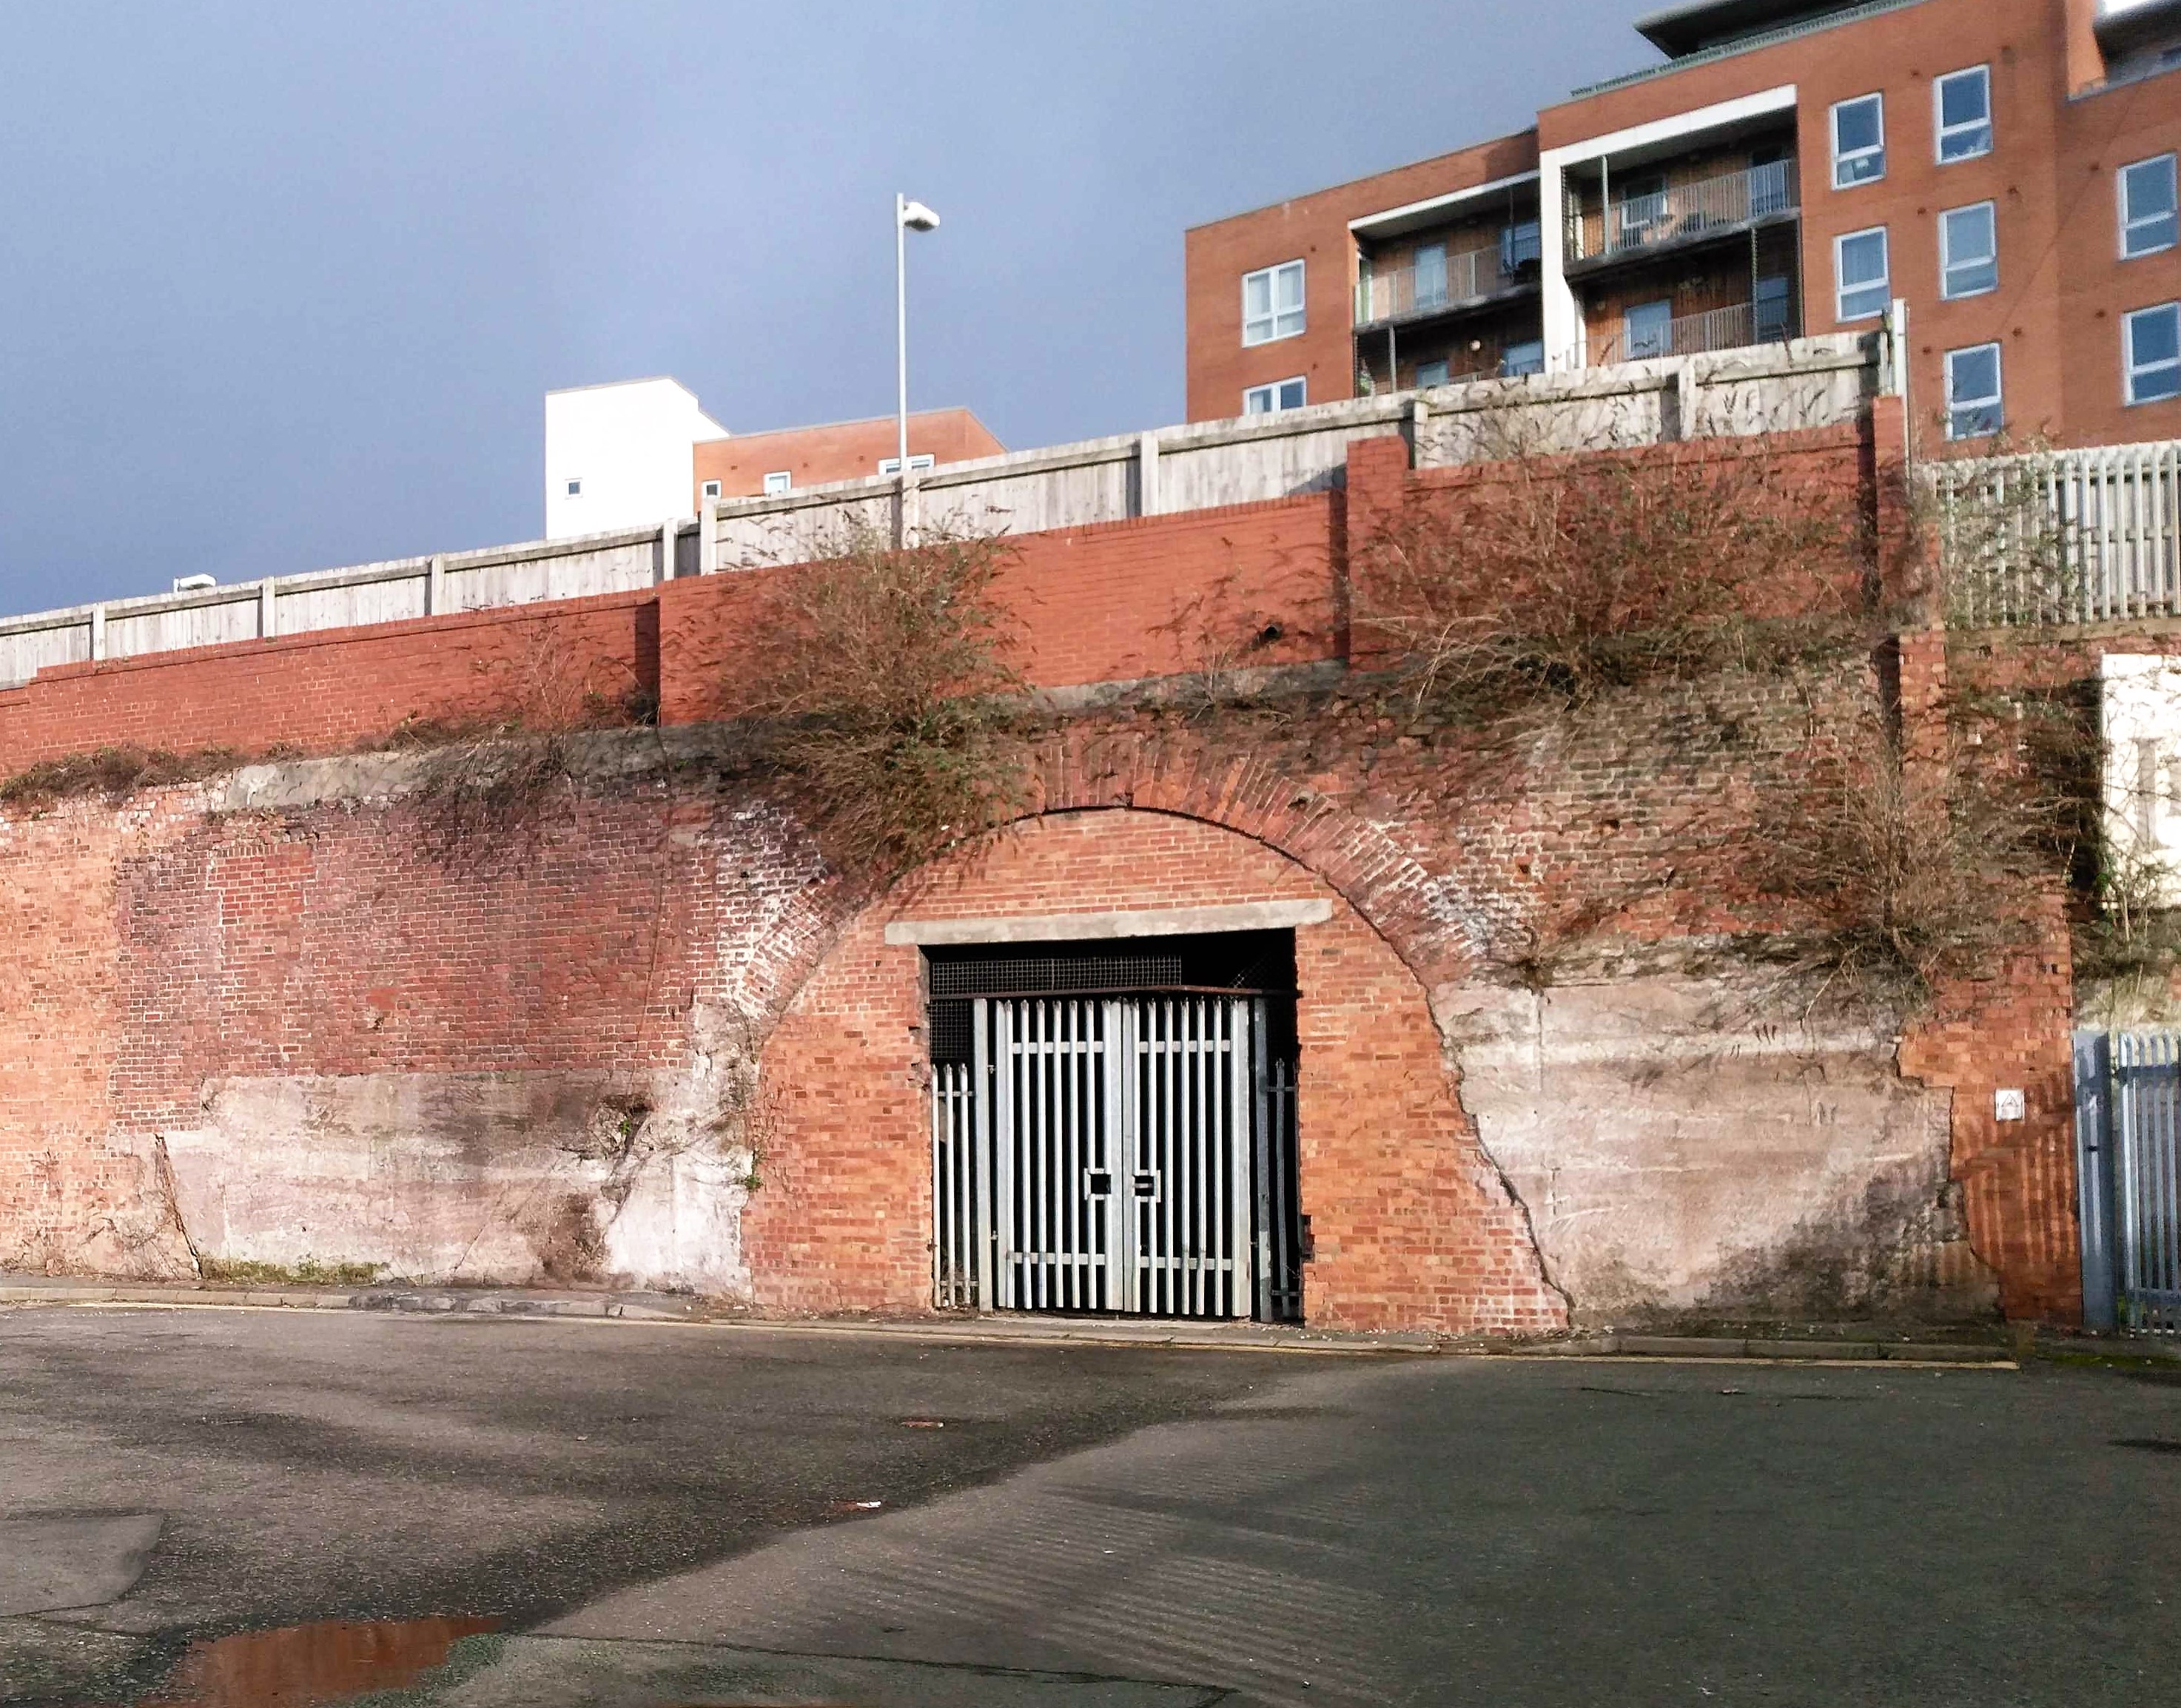
Although the bridge was dismantled in the 1970s, a footbridge remains. Further details from Sutton Beauty website and the 8D Association

Update 3/9/19: Added image of William IV

Telford's section and the Wapping Tunnel

I blogged previously about Telford's section of the Liverpool & Manchester Railway (L&MR) but thought it worth considering the Wapping Tunnel in detail. When built it was the first railway tunnel to run under a major metropolis. It took gravity-worked goods trains from Edge Hill down to the station at Wapping on the banks of the Mersey with the reverse journey rope-hauled by a stationary engine in the iconic Moorish Arch at Edge Hill.

As usual, some caveats: I am not an historian, engineer or expert on the Wapping Tunnel; moreover, the build was a very quick hack and mainly shows information already on the chart. Nevertheless, it raises a few questions.

For those looking for insights as to how early railway tunnels were built, I found this video instructive.

liverpool wapping tunnel profile3
Fig: Two miles of the Telford section is mapped onto 512 m virtual land. The vertical axis is roughly to scale but the horizontal axis is compressed just over 6-fold. The blue prims represent air holes and the individual red prims the "borings", including eyes from which the tunnel was extended. Most, but possibly not all, were located on the south side of the tunnel as shown. The profile is roughly aligned with the 1836 Gage map.

Construction started in January 1827 and involved the sinking of side-access construction shafts ("eyes") at roughly 60 m intervals followed by 2.4 m square profiled horizontal shafts ("headings"). The final pair of headings met in June 1828 and the finished tunnel was gas-lit and opened to the public for inspection in July the following year. It entered service on the opening day of the railway on 15th September 1830 and closed to traffic in 1965. The current state of the tunnel can be gauged from a recent set of photographs.

liverpool wapping portal 2019
The Wapping Tunnel portal at the western terminus, now King's Dock Street

What is a boring?

The build shows borings 1-19 in the form of red-coloured "eyes". It is possible, however, that some of the borings shown on the section were for geological investigation rather than construction and these are rendered semi-transparent in the model. For example, the first boring is in the cutting at Wapping station although it seems unlikely that the tunnel was to continue under that area.

Which borings were used for tunneling?

Thomas (p.39) lists eight eyes (from west to east):

  1. Great George Square (White Street),

  2. Great George Chapel,

  3. White Delf (Duke Street),

  4. Yellow Delf (Hope Street),

  5. Bedford Street (Penitentiary),

  6. Mosslake Fields, east of Vine Street (also known as Myrtle Street; contractor: Copeland),

  7. Millers Close/Mill Field (Crown Street)

  8. Edge Hill.

The section is largely in agreement with the above although it suggests that there may have been additional eyes at Blackburne Place and Smithdown Lane.

Ventilation

The course of the tunnel continues to be marked by ventilation shafts erected in the 1890s to permit working of the tunnel by locomotives. Those at Rathbone Street and Vine Street have been lost but three remain at White Street, Blackburne Place and Crown Street.

liverpool wapping tunnel bfa eaw023593 1949
Fig: Ventilation shafts at White Street, Rathbone Street, Blackburne Place and Crown Street shown outlined in green with the so-called Crow's Foot at the Wapping end of the tunnel in the foreground. Vine/Myrtle St shaft not shown. Photo courtesy of Britian From Above, dated 1949.

By contrast with the borings, there are only nine air holes. My guess is that the main eyes used in construction were sited at borings with adjacent air holes. In some cases, presumably where land access was a limiting factor, the boring and air hole were co-located (e.g. White Delf) but the preference may have been to have them slightly offset where possible (e.g. Millers Close), the assumption being that in the initial stages the air supply from the eye would suffice but that subsequently a through draft was required.

However, Carlson (p.190) appears to suggest that no air flow was available other than between eyes and that the situation became critical for those working underground until such communication was established. This might suggest that the air holes were intended for subsequent routine use of the tunnel rather than during construction.

By contrast, Thomas (p.40) suggests that wooden ventilation ducts provided by the L&MR were extended along the tunnel as work progressed. This seems to imply that some form of forced ventilation was employed, at least at the workface. This suggests possible use of a fan although widespread adoption of such technology was probably still a decade or two in the future. Instead, in coal mines a flow of air was typically generated by means of a furnace at the bottom of an air hole.

The situation with the Wapping Tunnel remains ambiguous although, of course, circumstances may have varied between the sections under the three contractors and at different phases of the project.

Observations and discrepancies

From west (Wapping) to east (Edge Hill)…

The first oddity are the muliple annotations on the section indicating that the tunnel is 15 ft high when most sources quote 16 ft. Telford's assistant may have been erroneously informed by his "minder" (Stephenson was absent) rather than making an incorrect measurement himself.

The section shows that the western end of the tunnel was relatively level and indeed had a gentle upwards gradient into Wapping station, presumably to assist with braking at the end of a gravity run. This section was typically worked by horse or manpower and the western end of the continuous rope (later cable) haulage system was located inside the tunnel at the start of the incline and hence not visible in Bury's print of the Wapping portal.

The section shows a large number of borings at the western end of the tunnel. This may have been in part a consequence of the proximity of the tunnel to the surface in a builtup area. Indeed, there are reports of damage to house foundations in Great George Square by subsidence as a result of tunneling as well as disruption of wells. The section between here and Great George Chapel was completed in mid-May 1828.

As previously blogged, White Delf was a secondary quarry on St James's Mount in the vicinity of Rathbone Street. Curiously there is a separate boring at Rathbone Street but no air hole although a ventilation shaft was subsequently built there in the 1890s. Whether the pre-existing boring was reused is unclear.

Yellow Delf was presumably located at the foot of the original quarry, later St James' Cemetery, which appears somewhat distant from the tunnel but likely extended northwards before the construction of Upper Duke Street. Thomas notes that visitors could access the tunnel works here via a short flight of steps rather than a bucket hoist.

Oddly Telford's section attributes the same boring number, 14, to both White and Yellow Delfs.

The section suggests that there was both an air hole and an eye at Blackburne Place although the latter is omitted from Thomas's list and hence may have been a later addition opened to accelerate completion of the tunnel. A ventilation shaft is still located there.

liverpool blackburne place vent
Fig: Blackburne Place ventilation shaft. Was there an eye here as well?

There is an nearby air hole but no eye at the Penitentiary Garden, probably what Thomas refers to as Bedford Street in his list of eyes. A drift here was used to correct the surveying error that led to the resignation of Vignoles and his replacement by Locke. Perhaps the eye post-dated the section on which Telford's was based or it had a very short life. On the other hand, in the absence of an eye the value of an air hole midway along the longest stretch between two eyes would be negligible until the two tunnels met. That said, much work remained to be done before the tunnel came into service although the air hole has not survived.

The length between Vine Street and Crown Street was both long and problematic with flooding and also a tunnel collapse in May 1827 near to Crown Street due to inadequate propping. Nevertheless, junction with the tunnel from Millfield was effected on 26th November 1827. The section does not show any evidence of levelling, presumably as the original was compiled before such work started.

There was an additional air hole and eye at Smithdown Lane, probably roughly where the head shunt now enters Crown Street Park.

There appears to be a pond between Smithdown Lane and the Edge Hill portal although it does not appear on contemporary maps. However, a nearby street is called Water Street.

The section suggests that there may have been a footpath across the railway "under sufferance" east of the tunnel portal at Edge Hill. Whether this corresponds to the Moorish Arch is unclear. The potential of the surrounding fields to yield marl for bricks is also evident.

edge hill grand area tunnel entrance
Fig: Wapping tunnel portal at Edge Hill from Lancashire Illustrated

Conclusion

The availability of Telford's section confirms many of the published observations but also raises further questions, notably the possible presence of two additional eyes at Blackburne Place and Smithdown Lane as well as the fate of the various shafts after the tunnel was completed and prior to construction of the five ventilation shafts in the 1890s, three of which continue to the present day.

While the OpenSim build is presently rudimentary, it has been useful in terms of siting the borings and air holes as well as integrating the profile with a reasonably contemporary map (courtesy of TROVE). Although it does not reflect the actual topography, it has potential for further refinement in terms of annotation with images and video.

Acknowledgements

Thanks to Paul of the Liverpool & Manchester Railway Trust and ICE for access to access to the section.

liverpool wapping tunnel looking west
Fig: Looking west from the tunnel portal at Edge Hill.

The modern world started here: Rainhill, Part 1

What, when…

I write, of course, of the Rainhill Trials that took place in October 1829, an amazing eight years before Victoria came to the throne. This was a contest (or ordeal as the organisers called it) to find the best performing locomotive and, hopefully, to demonstrate unequivocally the superiority of such engines over horses and stationary engines, a conclusion by no means obvious at the time.

If you know anything about this, you will know that the winner was Stephenson's Rocket. The prize was a £500 premium (now worth somewhere between £40K and £2.2M) on top of the purchase price of the engine assuming it passed muster. Not to mention great publicity and future sales, a place in the Science Museum and a kind of immortality tainted only by the death of Huskisson.

…and where?

Well, I knew it was in Rainhill so I went there (by train from Liverpool, of course) and visited the little museum at the back of the Library. It's in a railway carriage (naturally).

And there's a map.

Rainhill course mapr.png

Which led to a narrow bridge over the Liverpool to Manchester railway, sadly not the original wooden bridge but probably at a fairly similar location.

Rainhill footbridger.png

And pointing the lens on my phone through the wire grille looking west, I saw this. Humour me and try to imagine Rocket being readied for its ordeal and then pushed by hand to the starting-post.

Rainhill looking westr.png

Now look east towards Manchester and imagine Rocket accelerating away towards Post 1 where the judge, Mr Rastrick, starts timing the run.

Rainhill looking eastr.png

I guess everyone interested in the Liverpool & Manchester Railway makes this journey knowingly or otherwise in passing on the line beneath. Needless to say, the rest is history or, in this case, the long read that follows in Part 2.